A computer network is a collection of devices that can exchange data packets. These data packets travel between devices using IP addresses as destinations. As the packets move through the network, they create network traffic
Q What is Cloud Networking ?
A Before cloud computing, companies had to build their own physical networks. Cloud networking is like creating a shared postal system that everyone could use. Let AWS worry about purchasing the physical network hardware and setting up data centers, Pay only for the data transfer you actually use, not for idle equipment
Virtual Private Cloud (VPC)
Suppose if you won’t use VPC anyone who knows IP Address of your internal microservices can access then as they are exposed to the internet freely as Public IP’s
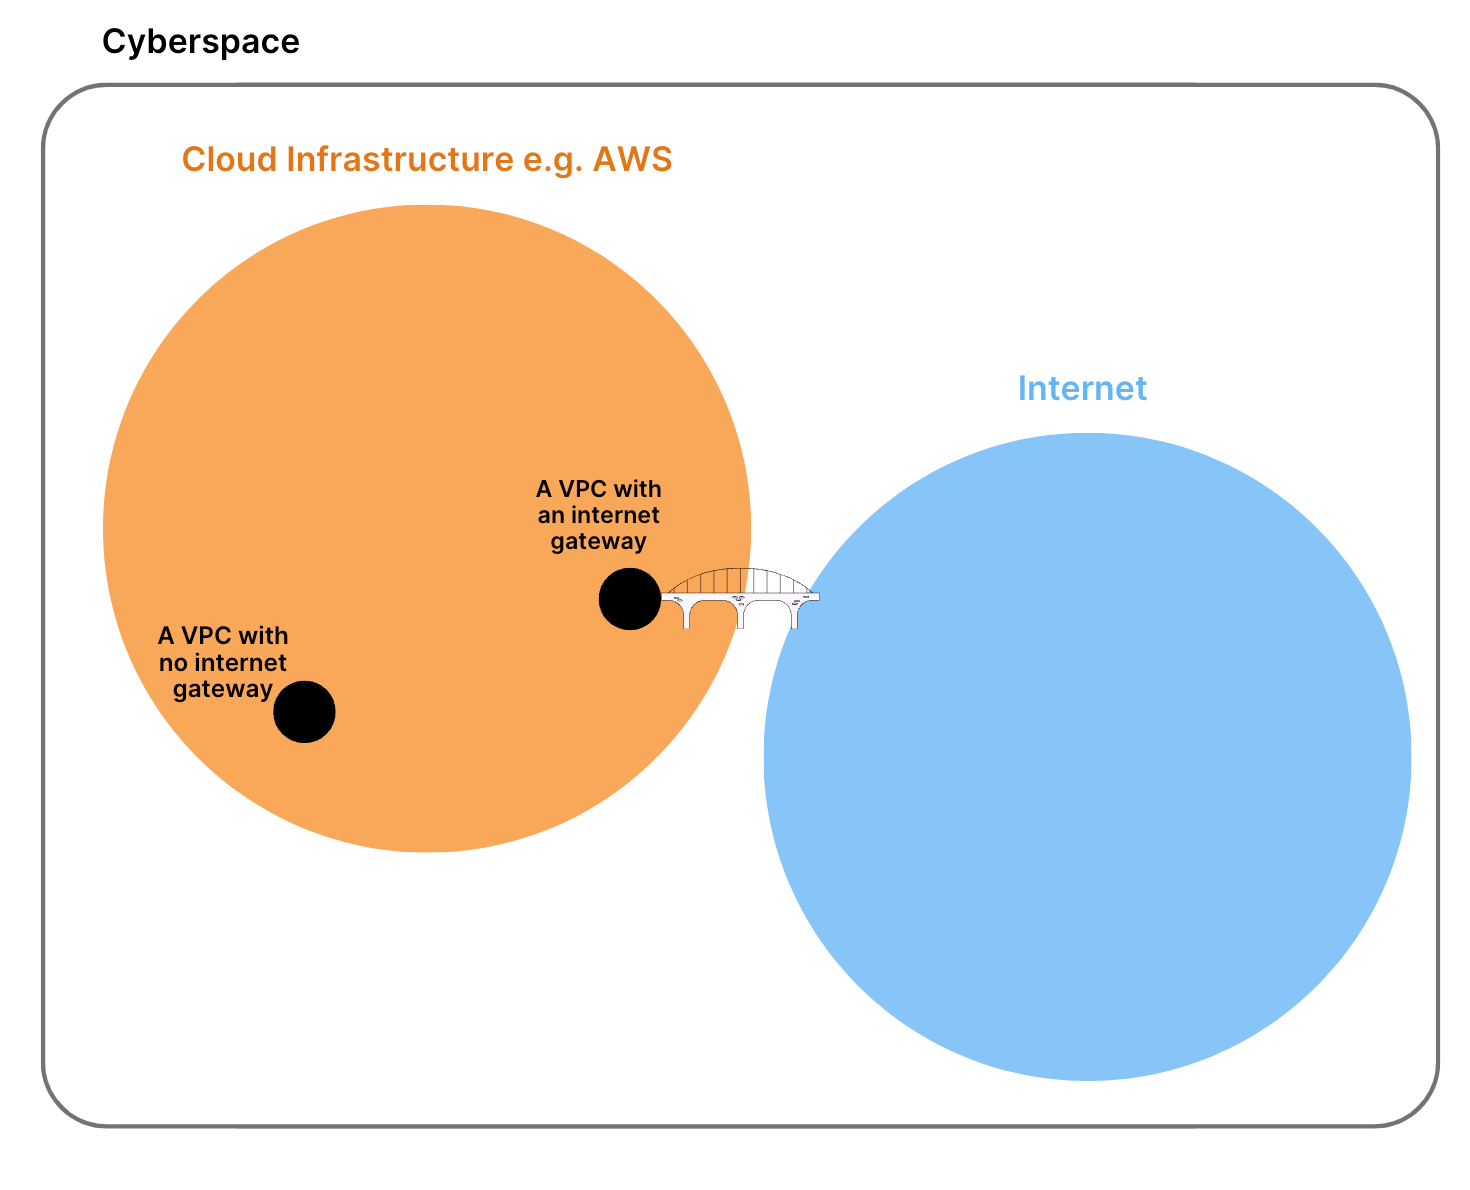
If AWS is like a massive global postal service with trucks, facilities, and delivery networks already built, then a VPC (Virtual Private Cloud) is like your own private section of the AWS network, where you control the flow of network traffic in and out of the AWS resources inside. Every AWS account comes with a default VPC, and you can create more
- When you created your AWS account, AWS automatically sets up a default VPC for you! This default VPC is why you could launch resources (e.g. EC2 instances) and connect services together from Day 1 of using AWS. If it didn’t exist, you would’ve had to learn how to create a VPC before you can use some of the services that need VPCs to function. This default VPC is a handy starting point, especially for beginners, but you can always create custom VPCs to fit specific requirements e.g. strict security measures
- You can use some AWS services like Amazon S3 or AWS Lambda without setting up a VPC. These services are designed to work on the internet without needing a private network setup.
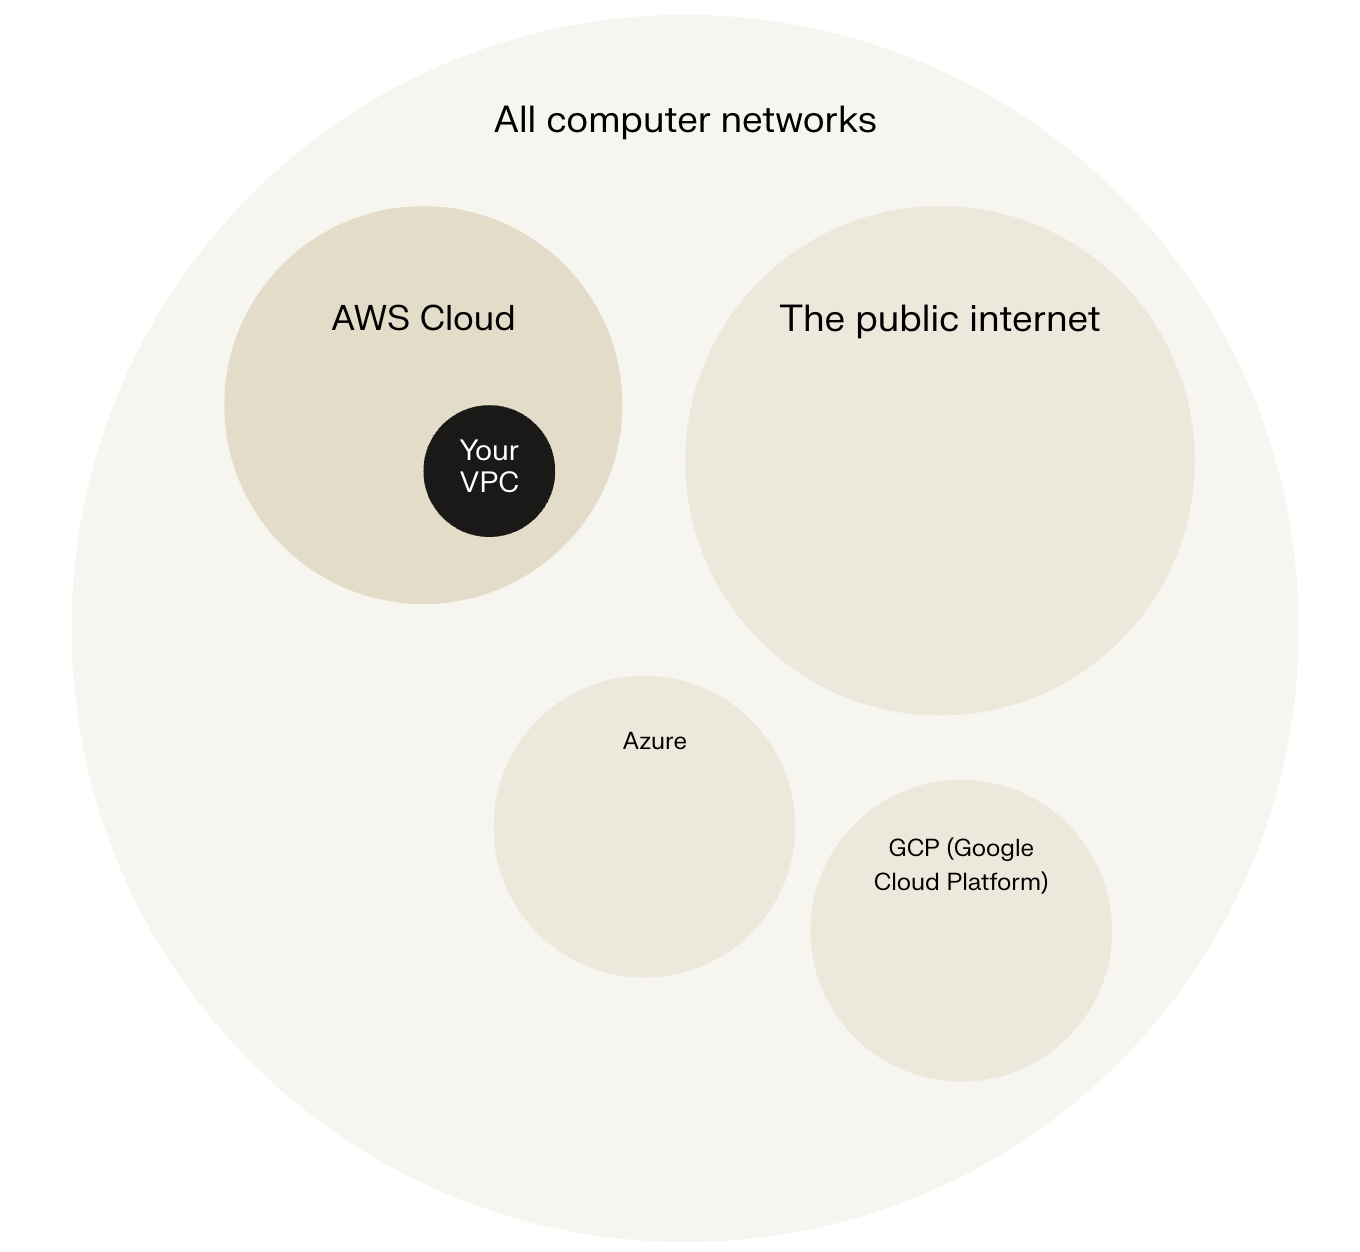
- Zooming out a little, the internet might be the most popular way to be online, but it’s not the only one. Being ‘online’ simply means being connected to a network that lets you communicate and exchange data with other people or servers. The broader space that includes every network is the cyberspace. Within cyberspace, we have different types of networks, like the public internet, private corporate networks, and cloud infrastructures.
When companies like Netflix or Airbnb build applications on AWS, they start by carefully designing their VPC because it determines:
- Who can access their applications
- How secure their customer data will be
- How their different services communicate with each other
- Whether their applications can connect to the internet
- How traffic flows between different parts of their system
Note: Jargons
- VPC: Virtual Private Cloud - your own isolated section of AWS
- Subnet: A subdivision of your VPC with its own IP address range
- CIDR Block(Classless Inter-Domain Routing): is a way to assign a whole block of IP addresses, kind of like creating a zone/area in a city (e.g., 10.0.0.0/16). To understand how big a CIDR block is, look at the number after the slash - the smaller the number, the larger the CIDR block
- Internet Gateway: Allows resources to connect to the internet
- Route Table: Rules that determine where network traffic is directed
- Security Group: Virtual firewall for individual resources
- Network ACL: Controls traffic entering and exiting subnets
- Public Subnet: A subnet with a route to the internet
- Private Subnet: A subnet without direct internet access
- VPC Peering: Connection between two VPCs
- Flow Logs: Records of the traffic in your VPC
Creating a VPC in AWS
1. Creating VPC
- Click on Create VPC
- Select
VPC Onlyand give it a Name - Give the CIDR value as
10.0.0.0/16, it means 32-16=16 it means we have2^16subnets possible, if it was10.0.0.0/24then 32-23=8, it means only2^8subnets would be available - Select
No IPv6 CIDR block - Give Tenancy as
Defaultas we want to ensure that instances launched in this VPC use the tenancy attribute specified at launch or if as are creating a VPC for Outposts private connectivity, If we want that instances launched in this VPC are run on dedicated tenancy instances regardless of the tenancy attribute specified at launch we need to chooseDedicated
Note: When you click VPC and more, you will get the resource map of existing VPC’s. Here are some new things when you won’t see when clicked VPC Only
- Number of Availability Zones (AZs): Select the availability zones wrt availability required
- Number of public subnets: When we pick 2 Availability Zones, the wizard makes sure you have a public subnet in each one. This way, your public resources stay up even if one of the two Availability Zones goes down. This setup is called redundancy (having backups in different places) and high availability (making sure your resources are always accessible). Just one public subnet wouldn’t offer this kind of reliability, so AWS doesn’t let you create just one
- Number of private subnets: Having more private subnets can help with organizing your resources and isolating them for security purposes, whereas public subnets are limited to ensure manageable exposure to the internet.
- NAT gateways ($): NAT gateways let instances in private subnets access the internet for updates and patches, while blocking inbound traffic. This is costly
- VPC endpoints: VPC endpoints let you connect your VPC privately to AWS services without using the public internet. This means your data stays within the AWS network, which can improve security and reduce data transfer costs.
2. Creating Subnets
If your VPC is a city, subnets are like different neighborhoods inside your city. You use subnets to group resources with similar access rules and restrictions. Some subnets might be public areas that all resources can access (public subnets) while others are private areas with limited access (private subnets).
A VPC can have as many public and private subnets as you need, but subnets in the same VPC cannot have overlapping IP address CIDR blocks! This means each subnet must have a unique range of IP addresses.
- Under VPC dashboard Select
Subnets - Click on
Create Subnetand choose the VPC in which you want to create the Subnet - Give the Subnet name as
Public 1- It’s a convention to name, to start the name withPublicif it’s a public subnet and withPrivateif it’s private subnet. But just by giving names they won’t become public or private we need to connect the Internet Gateway to make them public if not can just leave they will be private - Select the First Availability zone present (You can only select the availability zones from the region you have your subnet created)
- Select the IPV4 CIDR from the list
- Give
IPv4 subnet CIDR blockas10.0.0.0/24, can also give it as10.0.0.0/16but it’s better to give as enough as we want - Click on Create Subnet
- After Subnet is created
Select Subnet→ Click onActions→ SelectEdit Subnet Settings→ EnableEnable auto-assign public IPv4 address(By default, your resources already have private IP address, but this only allows internal communication within your VPC. To access the internet or be accessible from the internet, the instance would need a public IP address. When you enable auto-assign public IPv4 address for a subnet, any EC2 instance launched in that subnet will instantly get a public IP address so you won’t have to create one manually - a huge time saver) → Click onSave
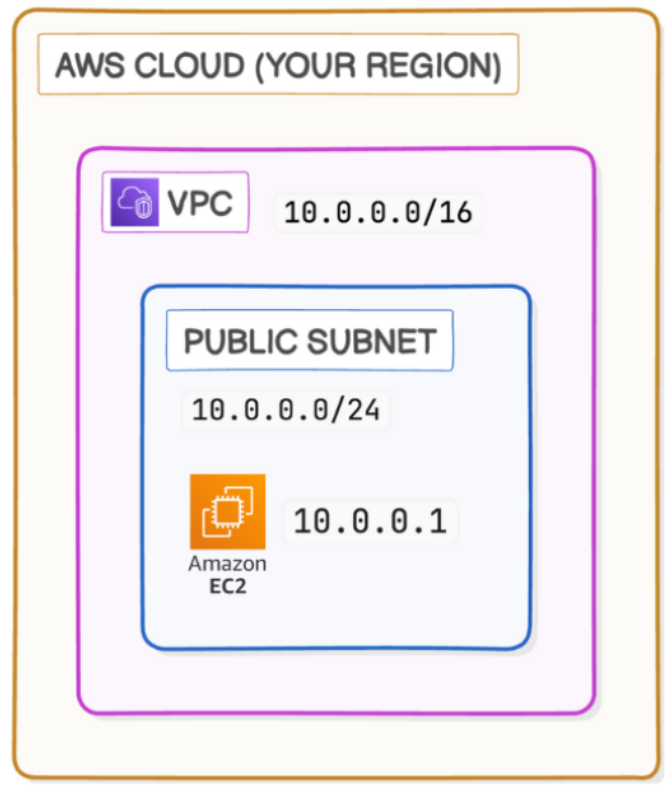
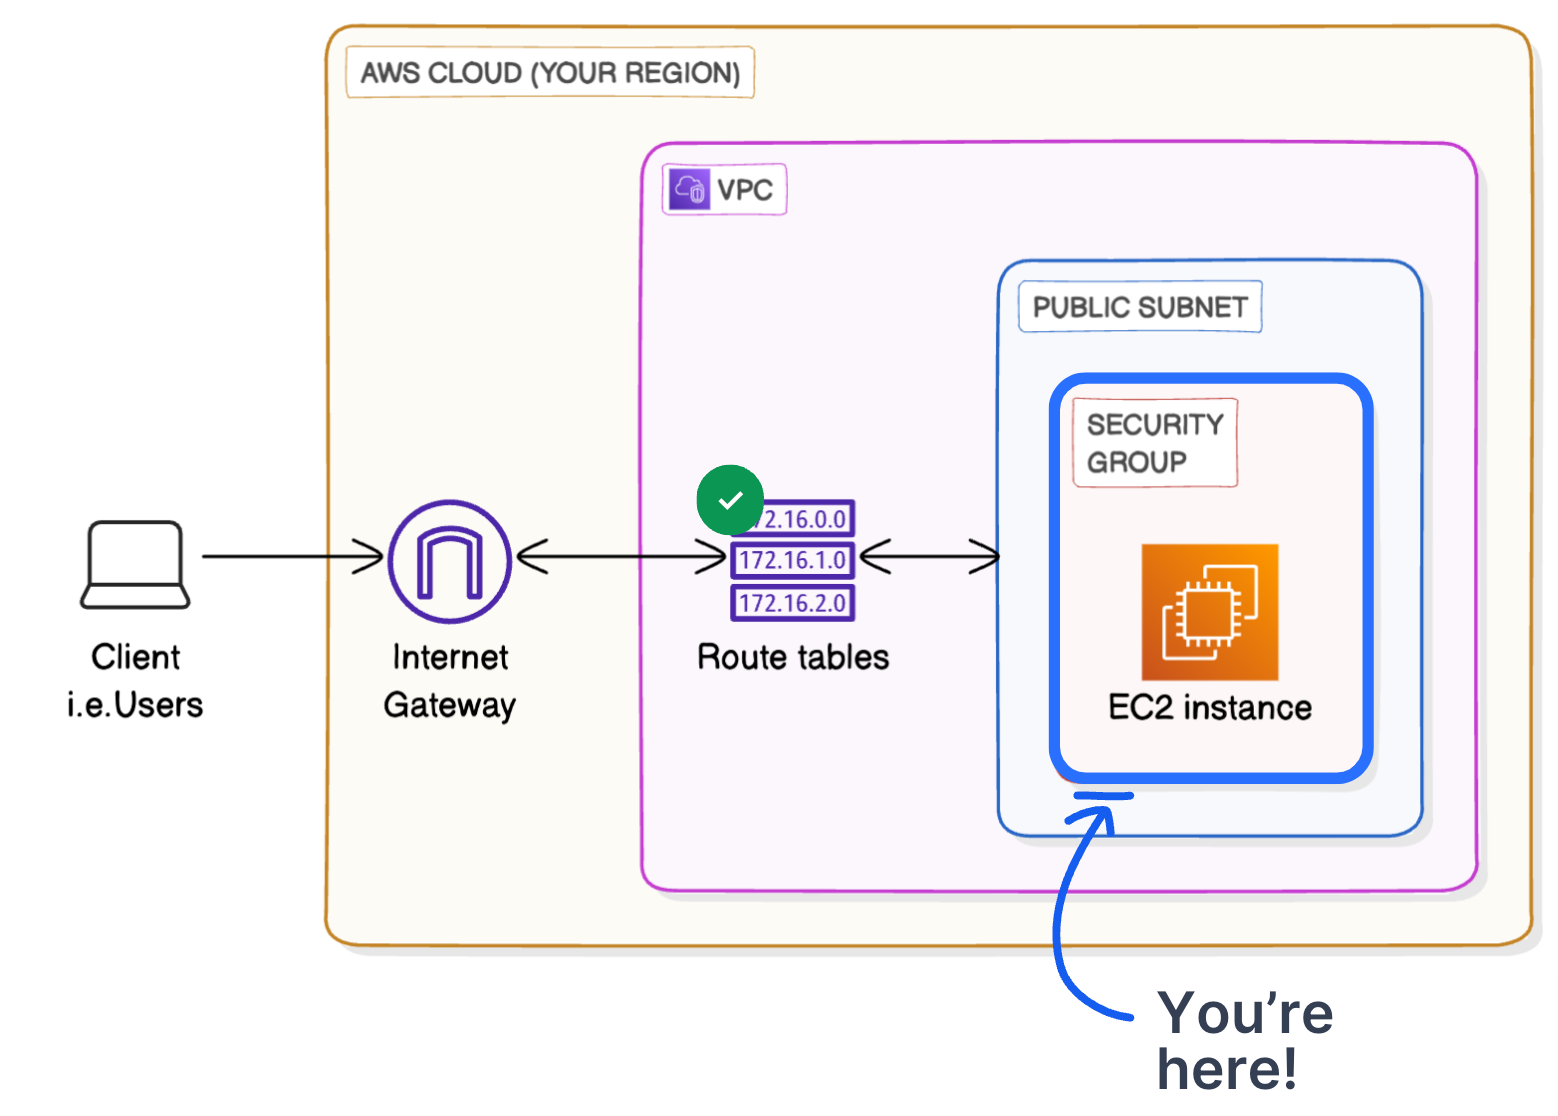
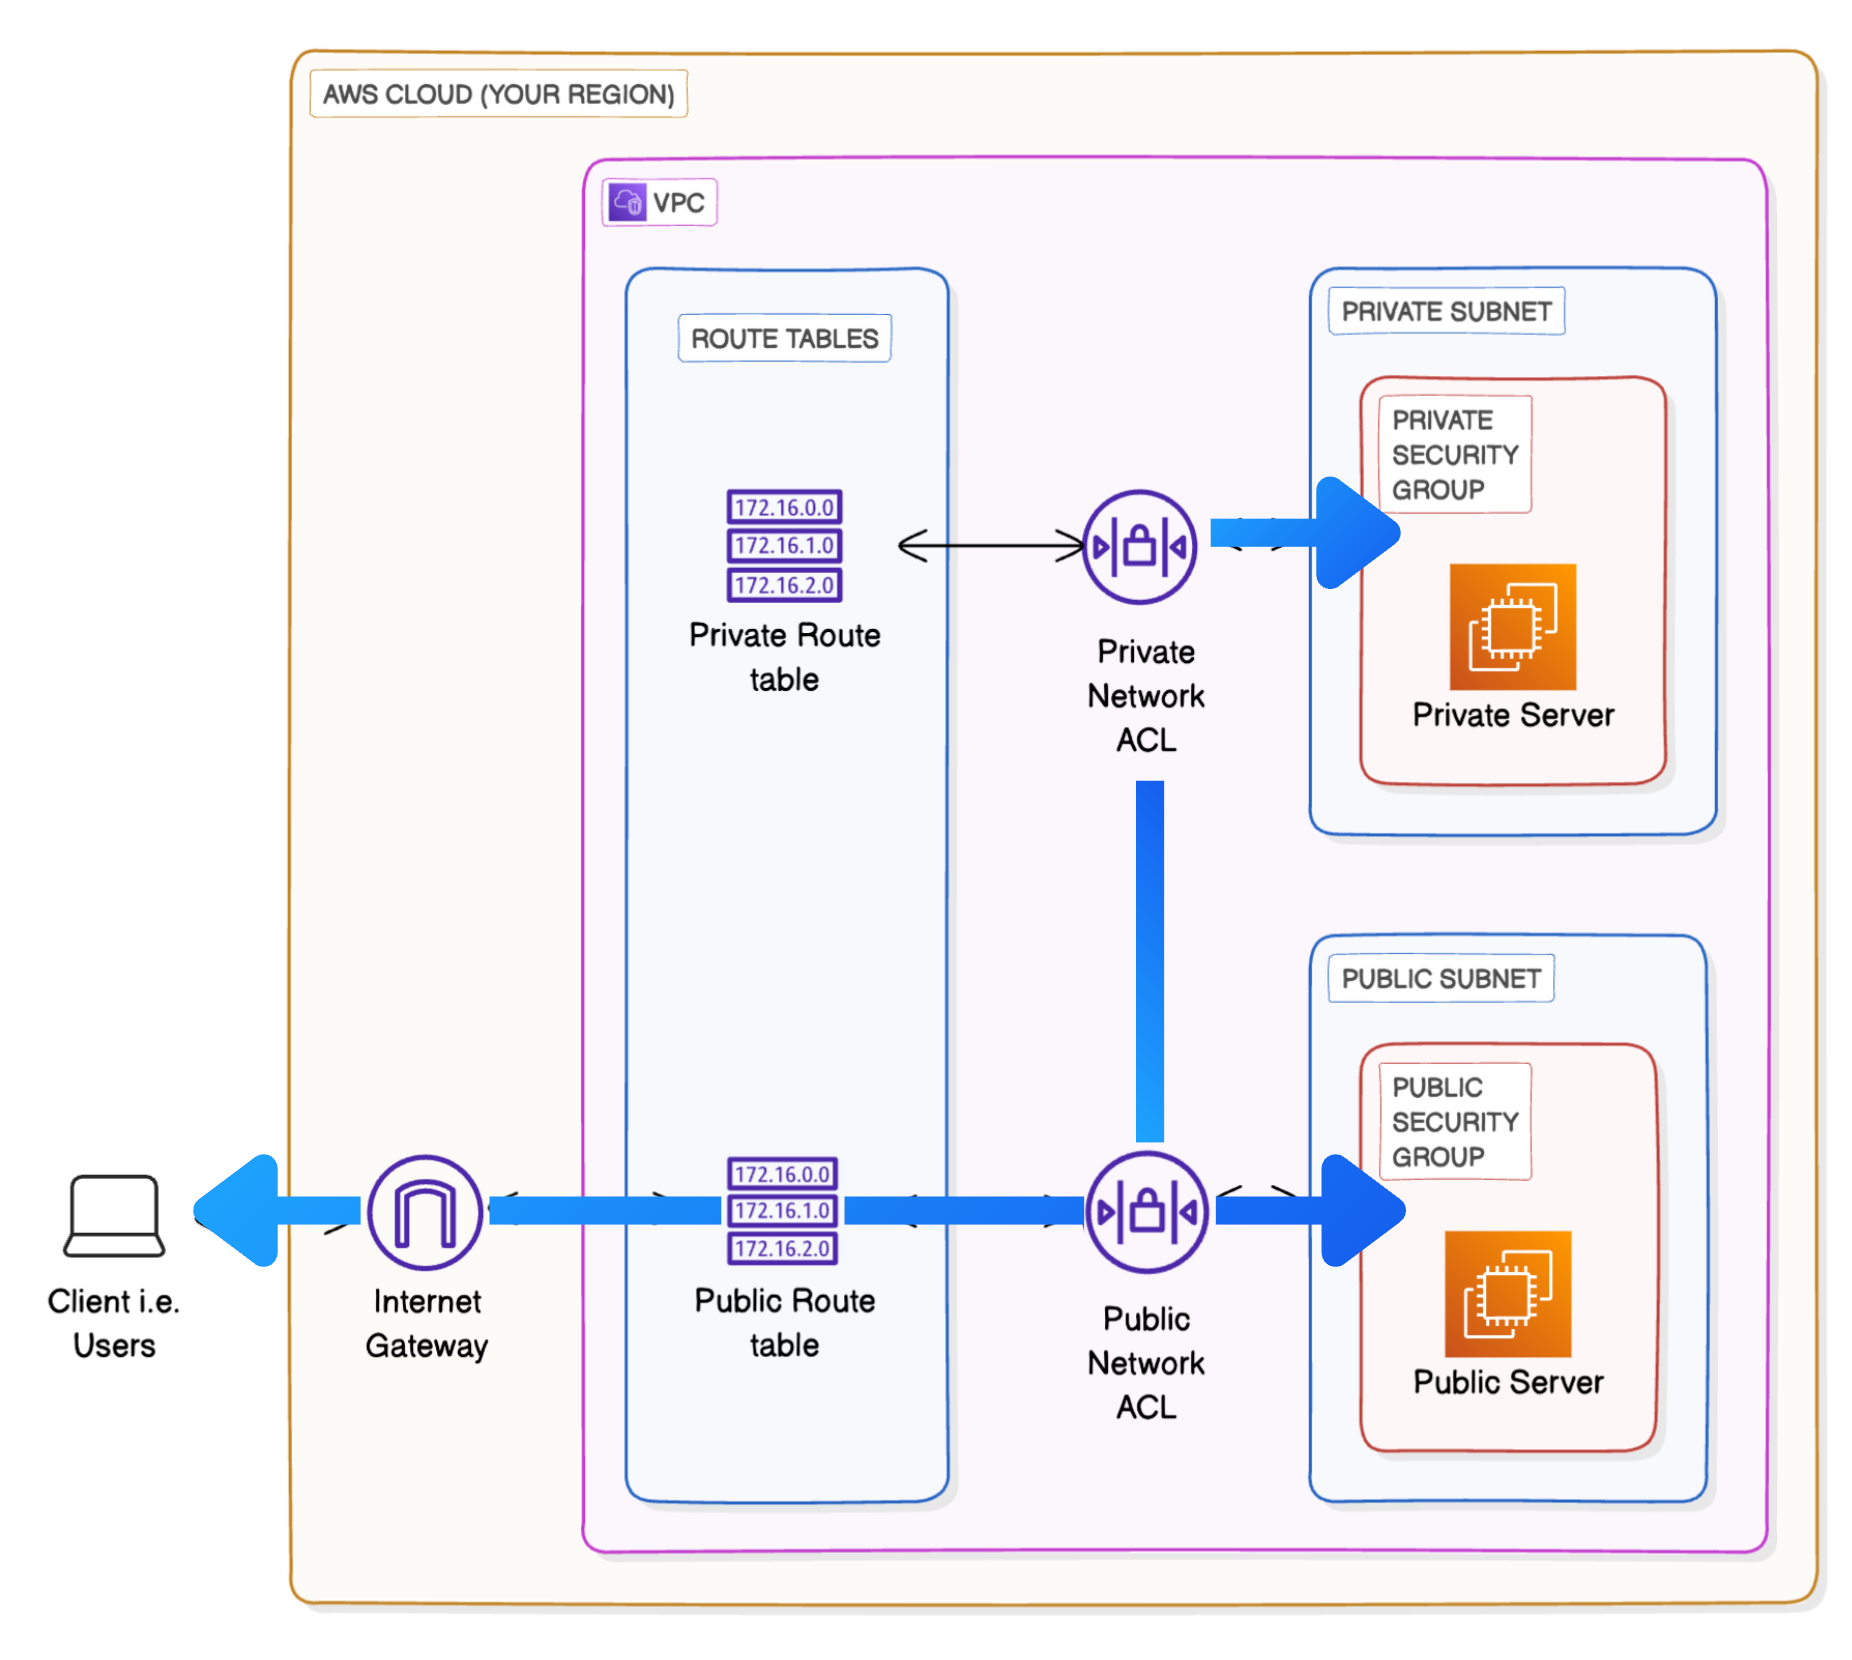
Current Situation(Ignore EC2) - We have a VPC with 65,536(2^16) Address, within it we have a subnet with 256(2^8) Address, within that if we create an EC2 we will have an one Public IP from that subnet attached to it
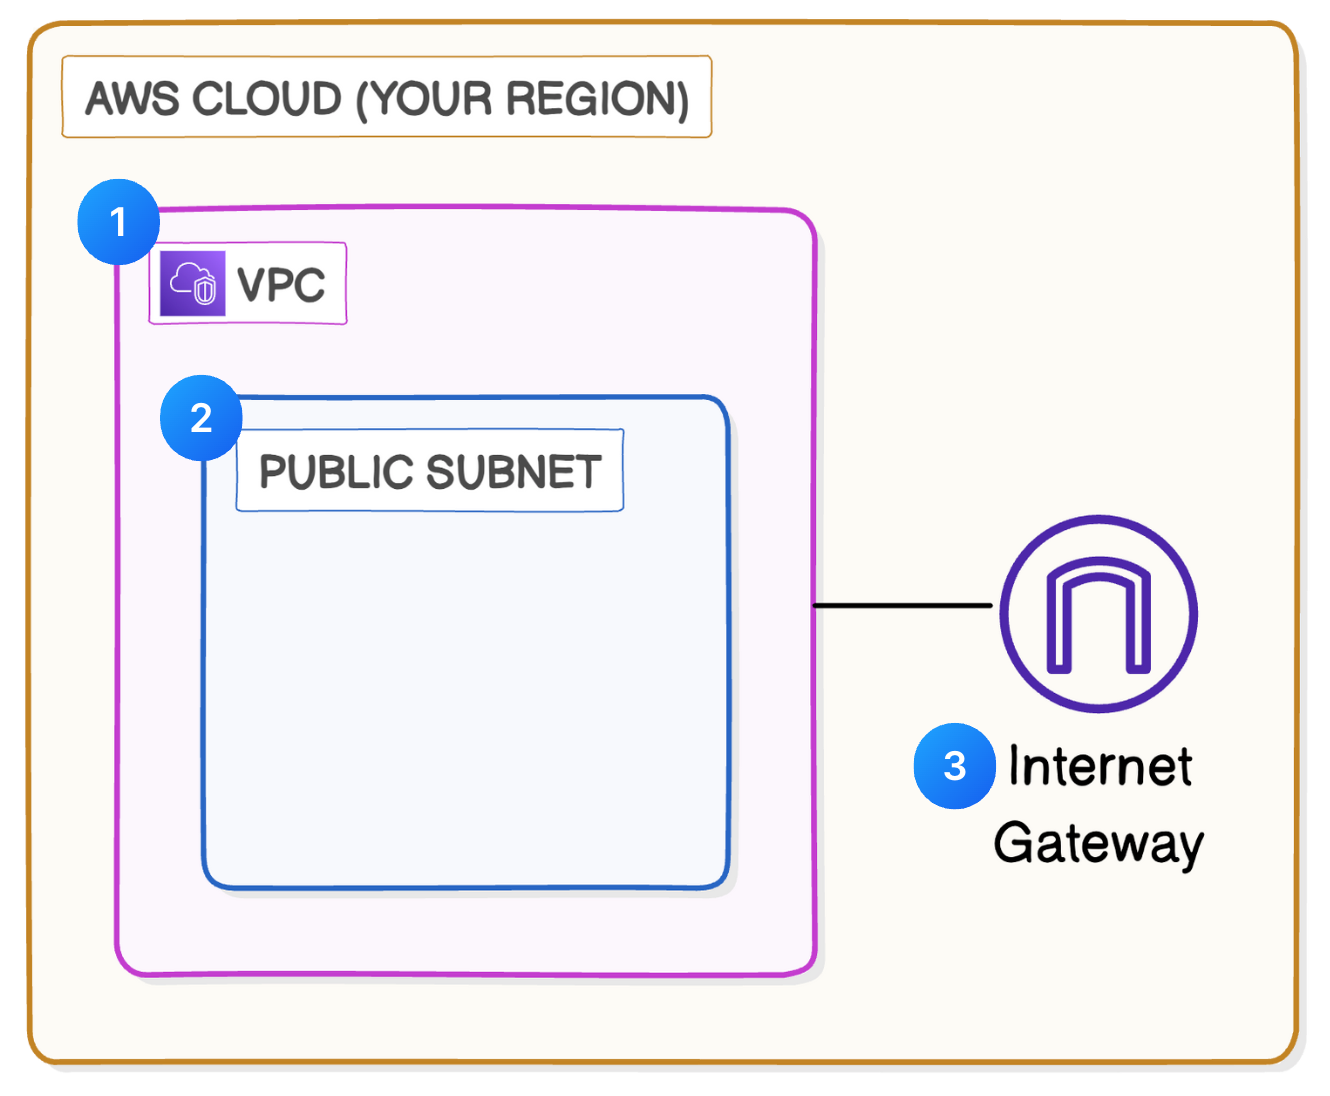
3. Attaching Internet Gateway to VPC
An internet gateway connects your city (VPC) and the outside world (internet). Internet gateways are key to making applications available on the internet. By attaching an internet gateway, your instances can access the internet and be accessible to external user
- Click on
internet gatewaysin sidebar - Give it a name and click on create
- After creating select
Actions→Attach to VPC→ Select VPC →Attach Internet Gateway
4. Create a Route Table
 Even though you’ve created an internet gateway and attached it to your VPC, you still have to tell the resource in your public subnet how to get to the internet. You’ll have to set up route tables to direct traffic from your resource to your internet gateway. A route table is a table of rules, called routes, that decide where the data in your network should go. Every subnet in your VPC needs to be linked to a route table, because the table tells your subnet’s traffic where to travel to send and receive data.
Q What’s the link between internet gateways and route tables?
A When a subnet’s route table has a route that directs internet-bound traffic to the internet gateway, the subnet becomes a public subnet. This means your subnet can communicate with the internet
- When you navigate to
Route tablesyou will see there is already an route table, created when you have created the VPC, Edit the name for ease - Click on the
Route table Idcolumn value, In routes table you will Target as Local it means that the traffic stays within the VPC, allowing internal communication between resources. if it’s like igw-xxxxxx then it means the traffic is routed to the internet via the Internet Gateway. - Click on
Edit Routes→Add Route→ Give Value as 0.0.0.0/0 (because When you set0.0.0.0/0as the destination in a route table, you are creating a default route that sends any traffic that doesn’t match more specific routes on your route table. If this is not set then all the traffic will be route to10.0.0.0/16thus giving access of our services to internet) → Give the Target asInternet Gateway→ And Select the Internet gateway → Save Changes → Now you have two routes, One is Local and One is Public in our route table - Go to
Subnet Associations→ Click onEdit Subnet Associations→ Select Subnet → Click on Save Associations → Now the subnet is public
Now the Incoming Traffic Coming will only come over via 0.0.0.0/0 and the internal communication in route table happens via 10.0.0.0/16
5. Creating a Security Group
 Every resource must be associated with a security group. This means security groups don’t attach to a VPC or a subnet, they attach to a specific resource within that VPC/subnet. If you don’t specify a security group when you launch a resource, it will use the default security group that AWS creates whenever you set up a VPC.
Security groups are responsible for checking who comes in and out. They have strict rules about what kind of traffic can enter or leave the resource based on its IP address, protocols and port numbers.
- Click on
Security Groups→ AWS already creates a default security group for the VPC (Click onVPC IDto know the attached VPC) - Click on
Create Security Group→ give it aName,DescriptionandSelect VPC - Inbound rules control the data that can enter the resources in your security group. Click on
Add Rule→ Select Type asHTTP→ Source asAnywhere IPV4→ Click onAdd Rule - Outbound rules control that data that your resources can send out. for example sending Email or getting response from an LLM. By default AWS keep all outbound traffic Open, that’s good now no need to change or add anything, can configure when it is needed, for example an Internal Sales team dashboard no need to communicate with the outside world
- Click on
Create Security Group
6. Create a Network ACL
When we talk about “traffic” moving through your VPC in AWS, we’re actually talking about data packets
Network ACLs are used to set broad traffic rules that apply to an entire subnet. For example, blocking incoming traffic from a particular range of IP addresses or denying all outbound traffic to certain ports. while Security groups allow for more granular control, managing access to individual resource. You can specify which ports and protocols are allowed for each connected resource.
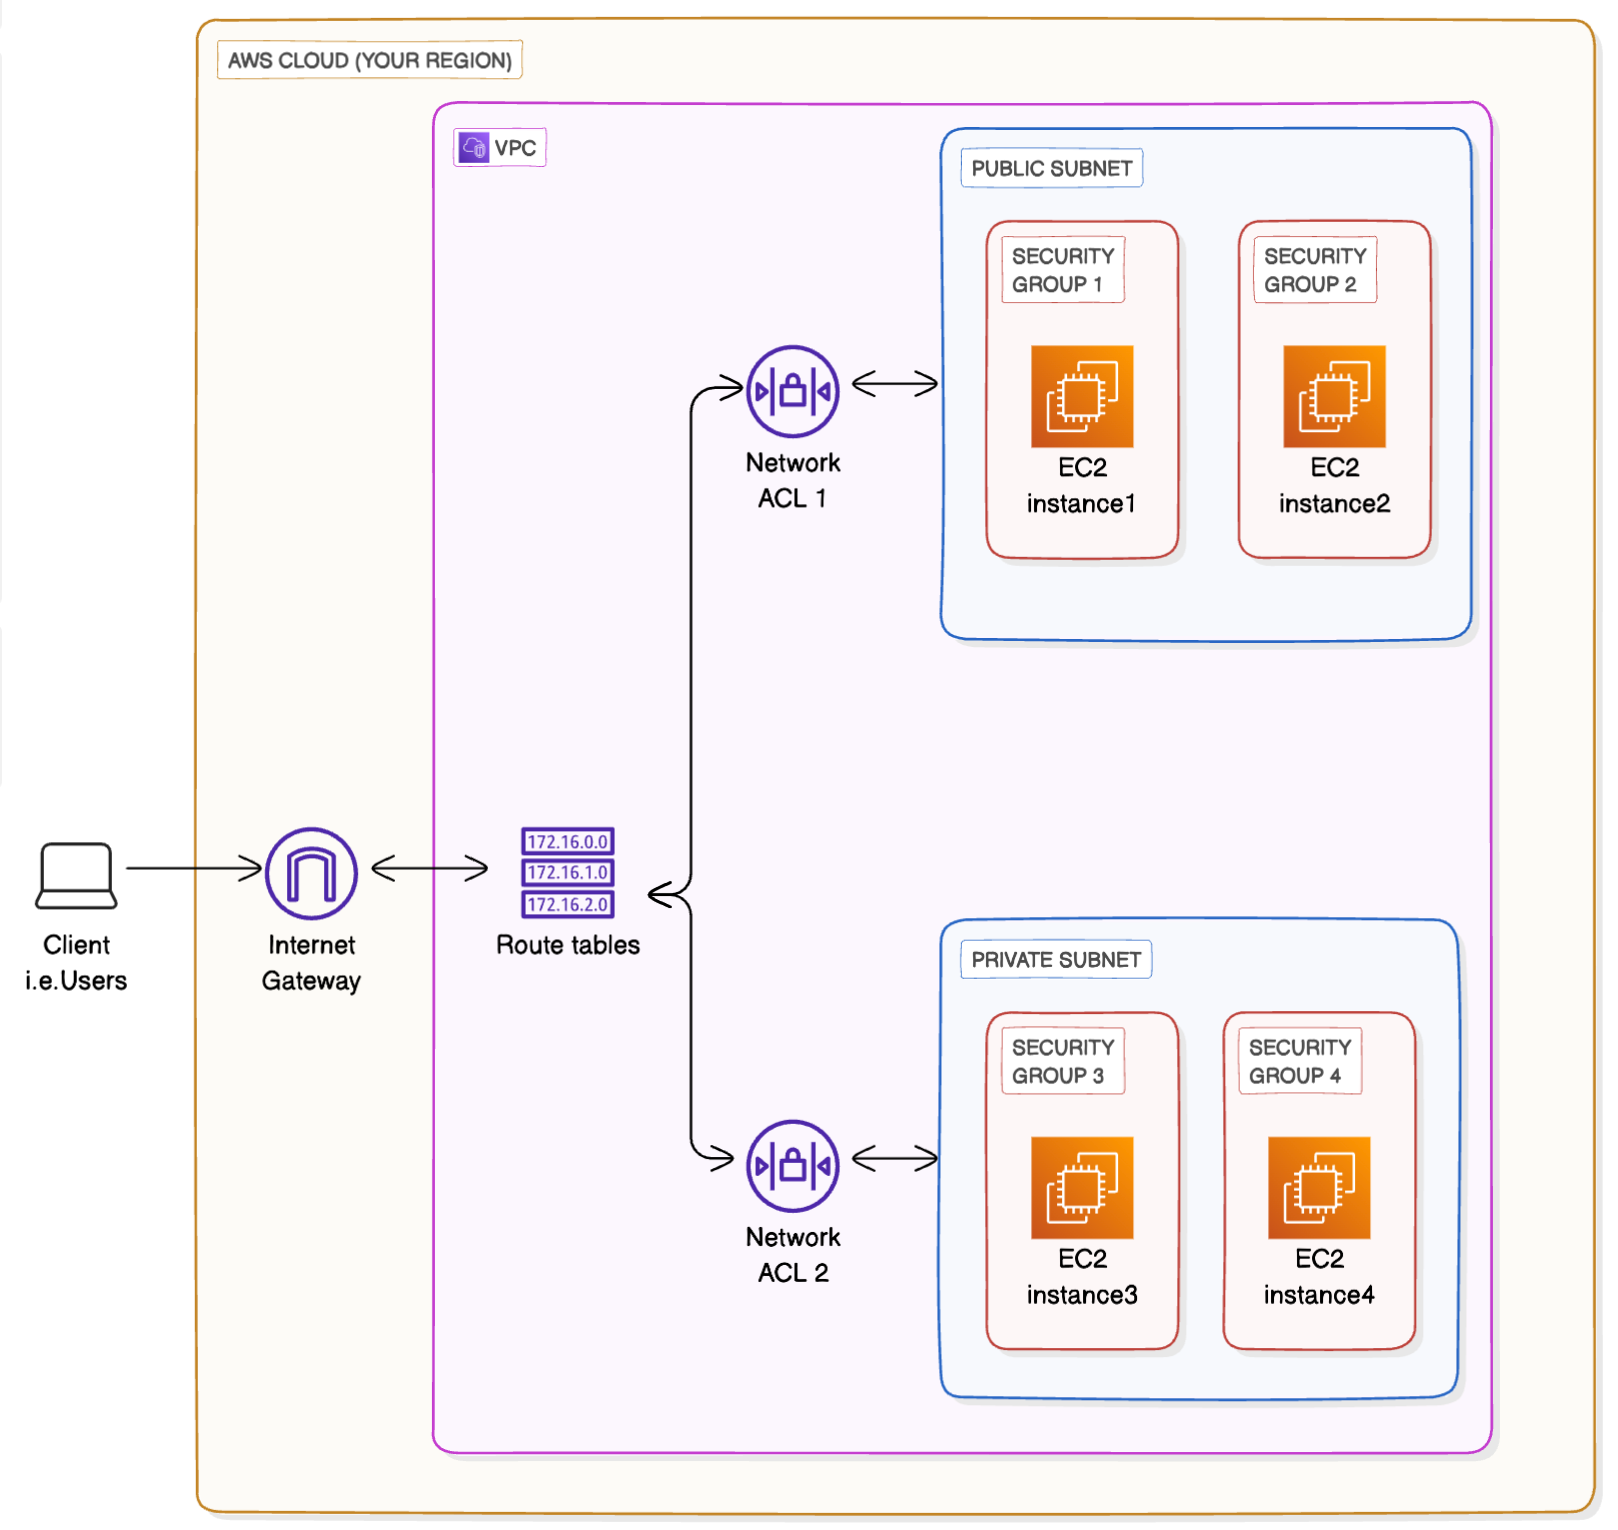
If we added extra subnets and security groups to our VPC! Note how the network ACLs work at the subnet level, while security groups work at the resource level
When Click on Network ACL ID we can see the Inbound and Outbound rules
- Rule 100 Inbound → Allows all inbound traffic into the
Public Subnet - Rule 100 Outbound → Allows all traffic out of the
Public Subnet *→ It acts as a catch-all rule in case traffic does not match any of the earlier rules. It’s useless when we haveRule 100
Just to learn let’s create an Network ACL
- Click on
Create Network ACL - Give it a
Nameand select theVPCthat needed to be attached. Click onCreate ACL Network - Click on
Network ACL ID→ Click onEdit Inbound Rules→ Click onAdd New Rule→ Give rule number as100→ Select type asAll Traffic→ The default will beAllow, can keep it like that here or also can edit if needed →Save Changes - Go to
Outbound Rules Tab→ Click onEdit Outbound Rules→ Click onAdd New Rule→ Give rule number as100→ Select type asAll Traffic→ The default will beAllow, can keep it like that here or also can edit if needed →Save Changes - Go to
Subnet Associations Tab→ Click onEdit Subnet Associations→ Select the Subnet →Save Changes. ACL can be associated with a subnet at a time. Once you associate your Public 1 subnet with a new ACL, the default ACL that AWS created for you gets replaced
7. Creating a Private Subnet
Follow same steps as of in Second Step. But here are the changes
- Name should start with
Private(Good convention not necessary) - We can’t give
IPv4 subnet CIDR blockas10.0.0.0/24as that block is occupied thus we give it as10.0.1.0/24
8. Setting up an Private Route Table
Follow same step as of in Fourth Step. But here are the changes
- In
Edit Subnet Associatesselect the private subnet andSave
9. Setting up an Private Network ACL
Follow the same steps as of in Sixth Step. But here are the changes
- See for which network ACL does the Private Subnet is attached to. If it is attached to other network ACL, Attach them to created Private ACL
Note: We don’t need to create an specific security group as they are created in resource level
Currently we are here
10. Creating a Public EC2 Server
Follow the same steps of the AWS EC2. But here are the changes
- In
Network Settingsclick on edit → SelectVPC,Public Subnet→ In firewall selectExisiting Security groupand select the security group - Click on
Luanch Instance - After created Select the
EC2 Instance→ Click onNetworking tab
11. Creating a Private EC2 Server
Follow the same steps of the AWS EC2. But here are the changes
- In
Network Settingsclick on edit → SelectVPC,Private Subnet→ Also select thesame key pairused in Public EC2 server - In firewall click
Edit→Create Security Group→ In Inbound rules selectSource typeasAnywhereand make sure thatTypeSelected asSSH - Click on
Luanch Instance - After created Select the
EC2 Instance→ Click onNetworking tab
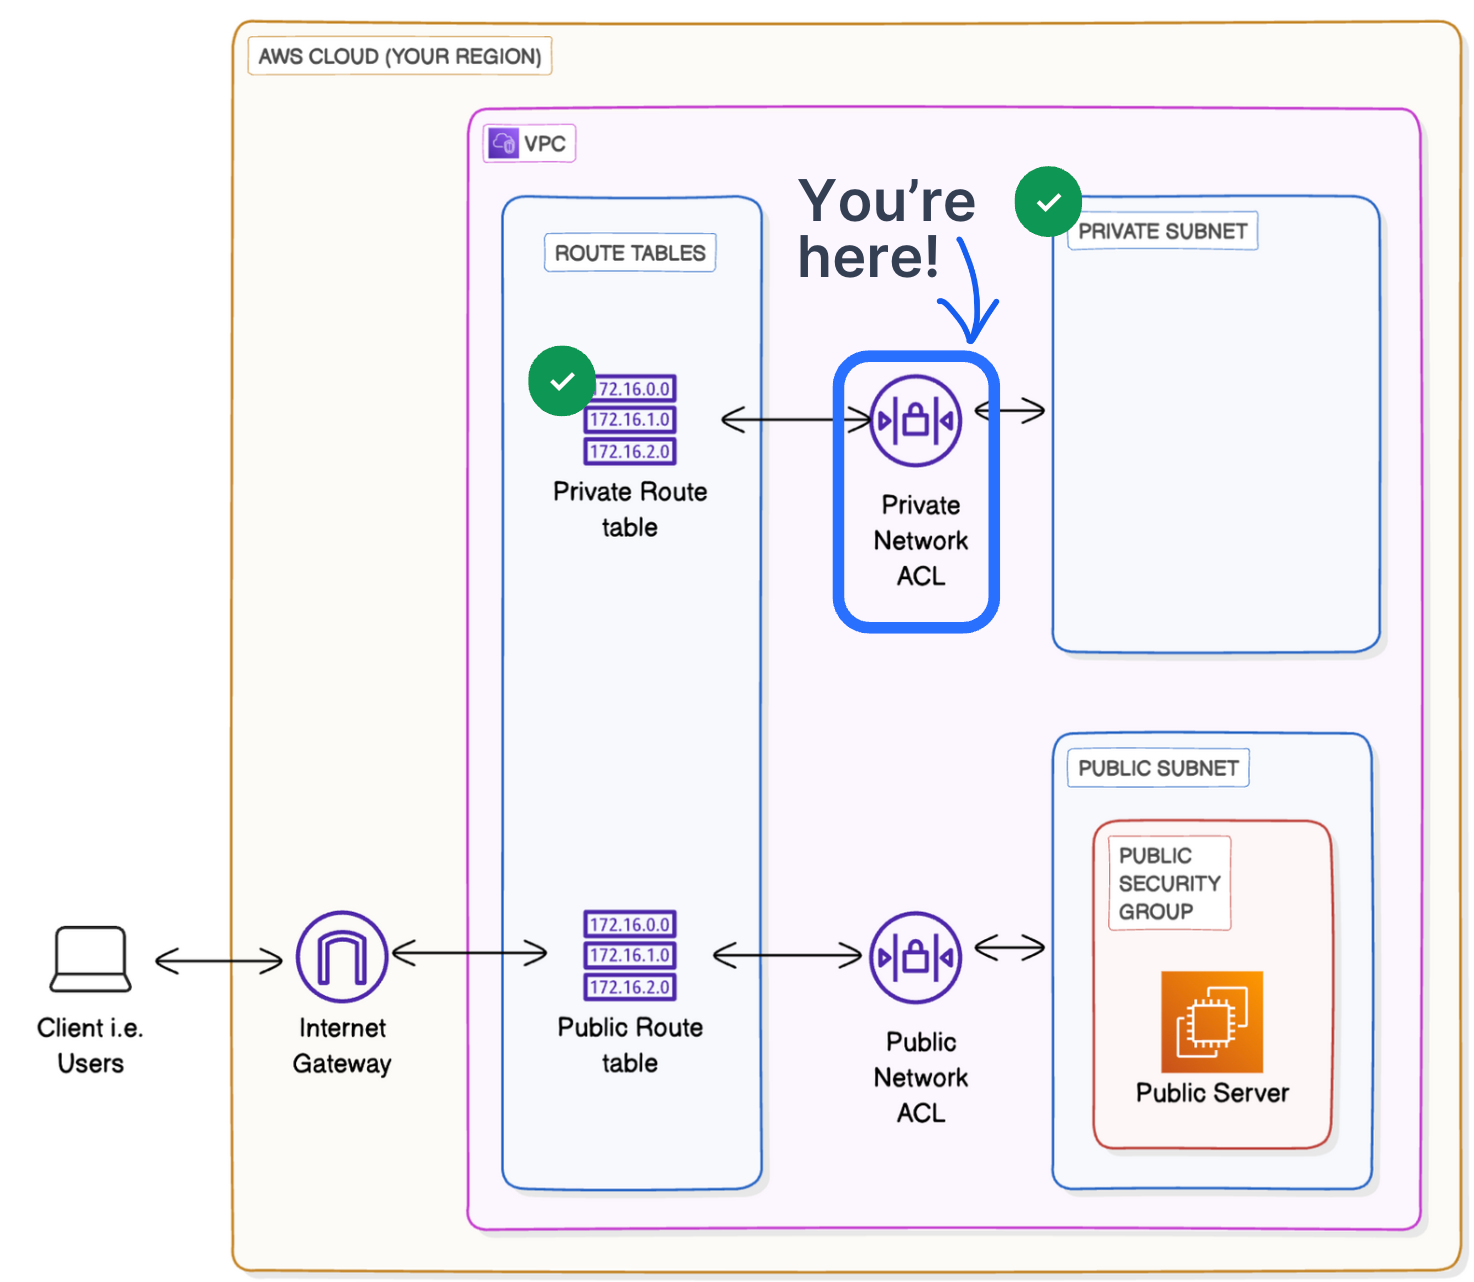
Currently we are here
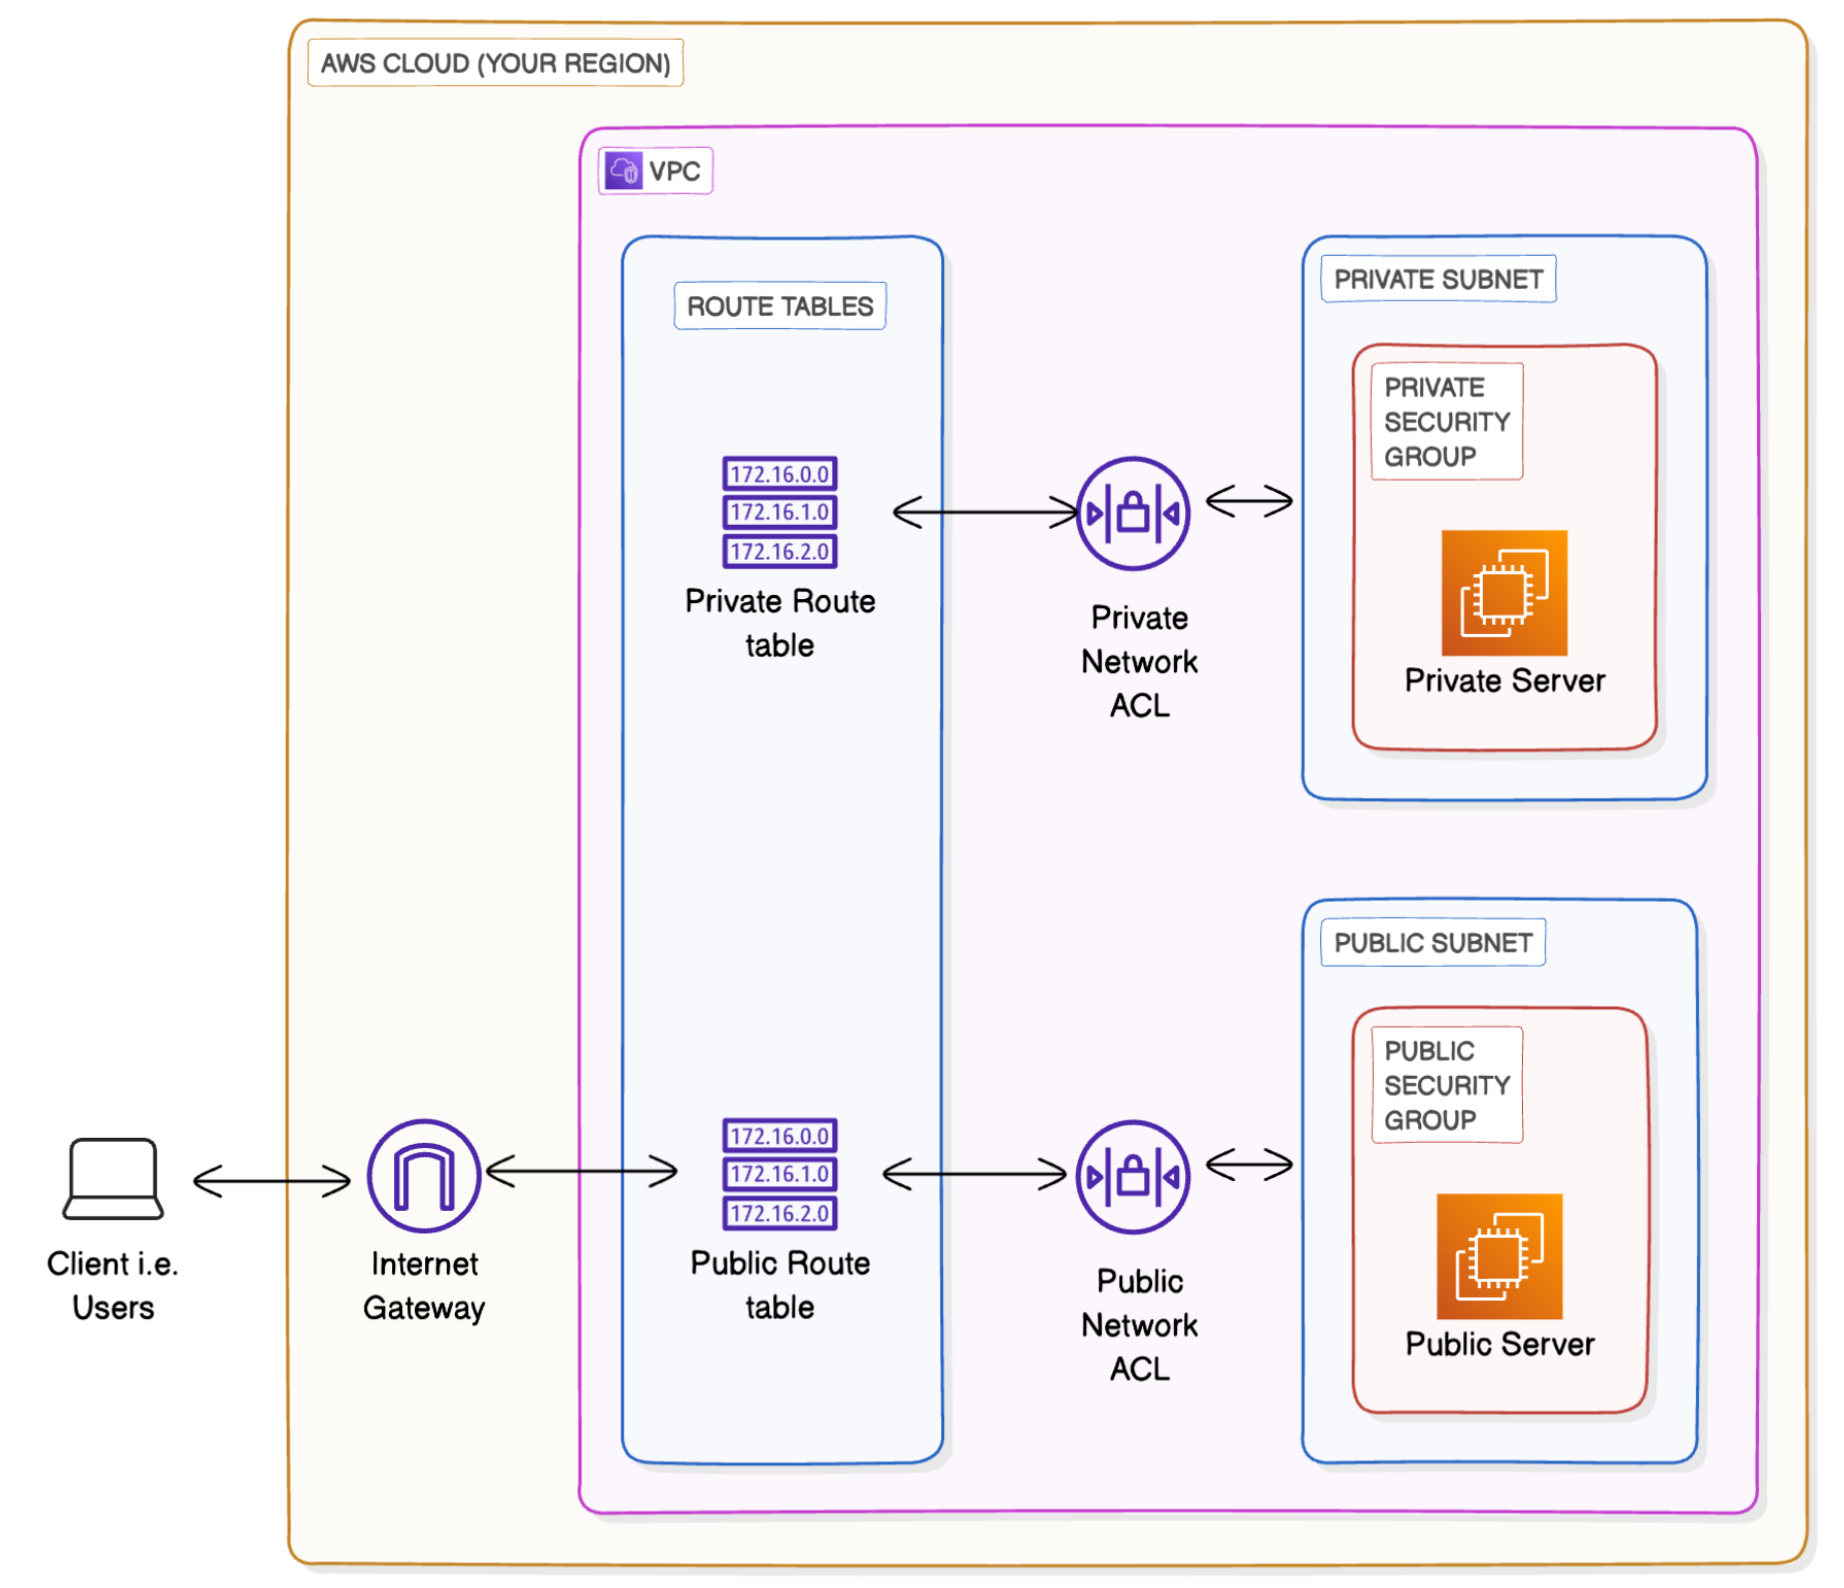
12. Communication between Public and Private EC2
This is essential as for example in real world, server might be Public EC2 and database might be Private EC2 and we want to communicate between them
- Select the
Public EC2 Serverand click onConnect→ There comes an error for connection → Ideal flow is to checkRoute Tables, nextNetwork ACL, nextSecurity Groups→ Here the problem is inSecurity Groupas we are accessing it viaSSHit is not added inInbound Rules→ AddSSHwith source asAnywhere IPV4(not the best solution but works for now) in Inbound rules → Now go back to EC2 and try to connect again - Now copy the
Private IPofPrivate EC2 Serverand typePING <IP address copied>in the public EC2 server terminal, we will not get the response due to blocking of the type of messages used in ping, which are known as ICMP (Internet Control Message Protocol) → To solve this error we need to add Inbound rule inNetwork ACLwithRule number: 100, Type asAll ICMP - IPV4, Source as10.0.0.0/24do the same forOutbound rulesalso. Also EditSecurity Groupinbound rules to allowICMPAdd Type asAll ICMP - IPV4and source asPublic Security Group(search in search bar beside source - we add this because we want to control in EC2 level not only in subnet level) - To check the internet access run command
curl google.com. If fails then debug every level by seeing the image and check inbound and outbound rules
Until know we have achieved all three modes of connectivity in VPC
13. Adding VPC Peering
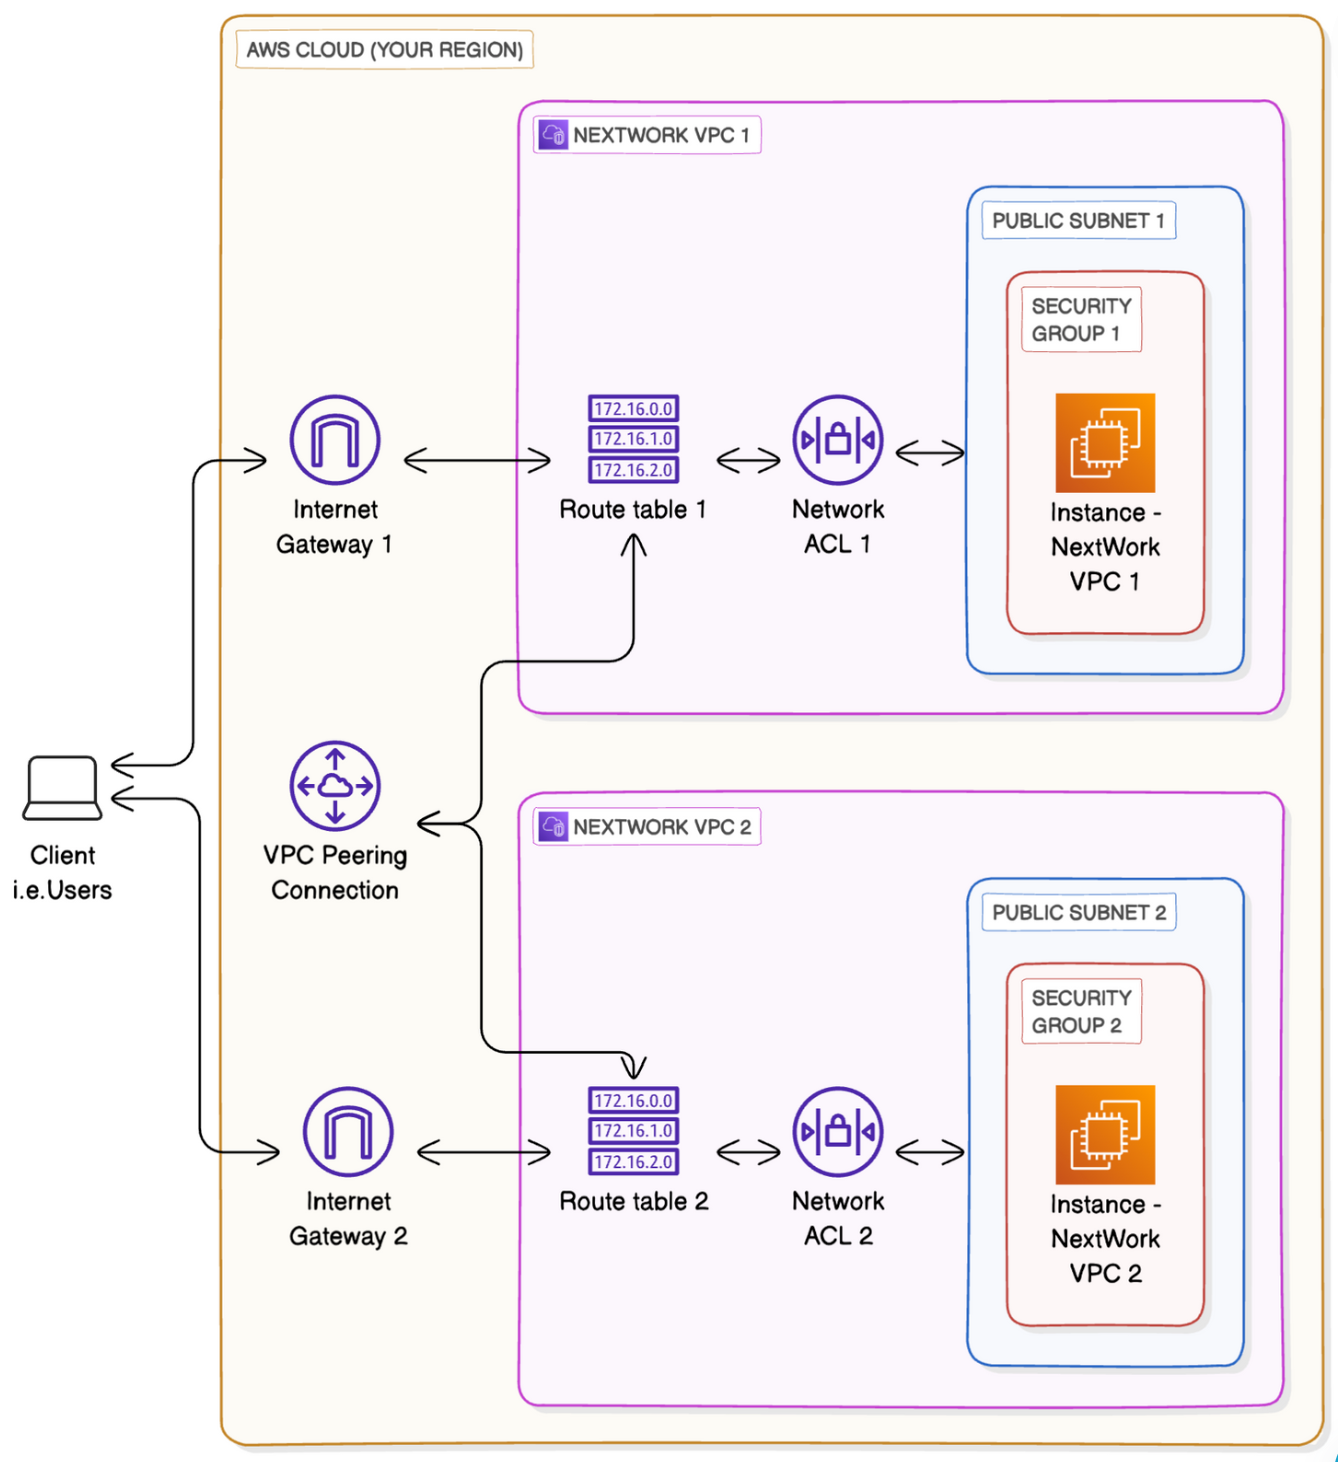 A peering connection lets VPCs and their resources route traffic between them using their private IP addresses. This means data can now be transferred between VPCs without going through the public internet.
- Go to
Peering Connections, Click on create peering connections - Give it name as
VPC 1 <> VPC 2, Select VPC ID(Requester)(Requester is the VPC that initiates a peering connection. As the requester, they will be sending the other VPC an invitation to connect!), Select VPC ID(Acceptor -Create Another VPC via VOC and moreremember to give the CIDR as10.1.0.0/16as we can’t connect two VOC with same CIDR)(Accepter is the VPC that receives a peering connection request! The Accepter can either accept or decline the invitation. This means the peering connection isn’t actually made until the other VPC also agrees to it) → Click onCreate→ After creations selectActionand click onAccept Request - Click on
Update Route Tables→ Edit Routes → Set Target asPeer Connection, and search peer connection below, set destination as10.1.0.0/16 - Go to EC2 dashboard → Go to
Elastic IPs→ Create elastic IP and connect to Public server now go to public EC2 server and connect and do the ping request to private server, If it works thenPeer connectionis working, if not go back to all levels and check their corresponding inbound and outbound rules
14. Monitoring
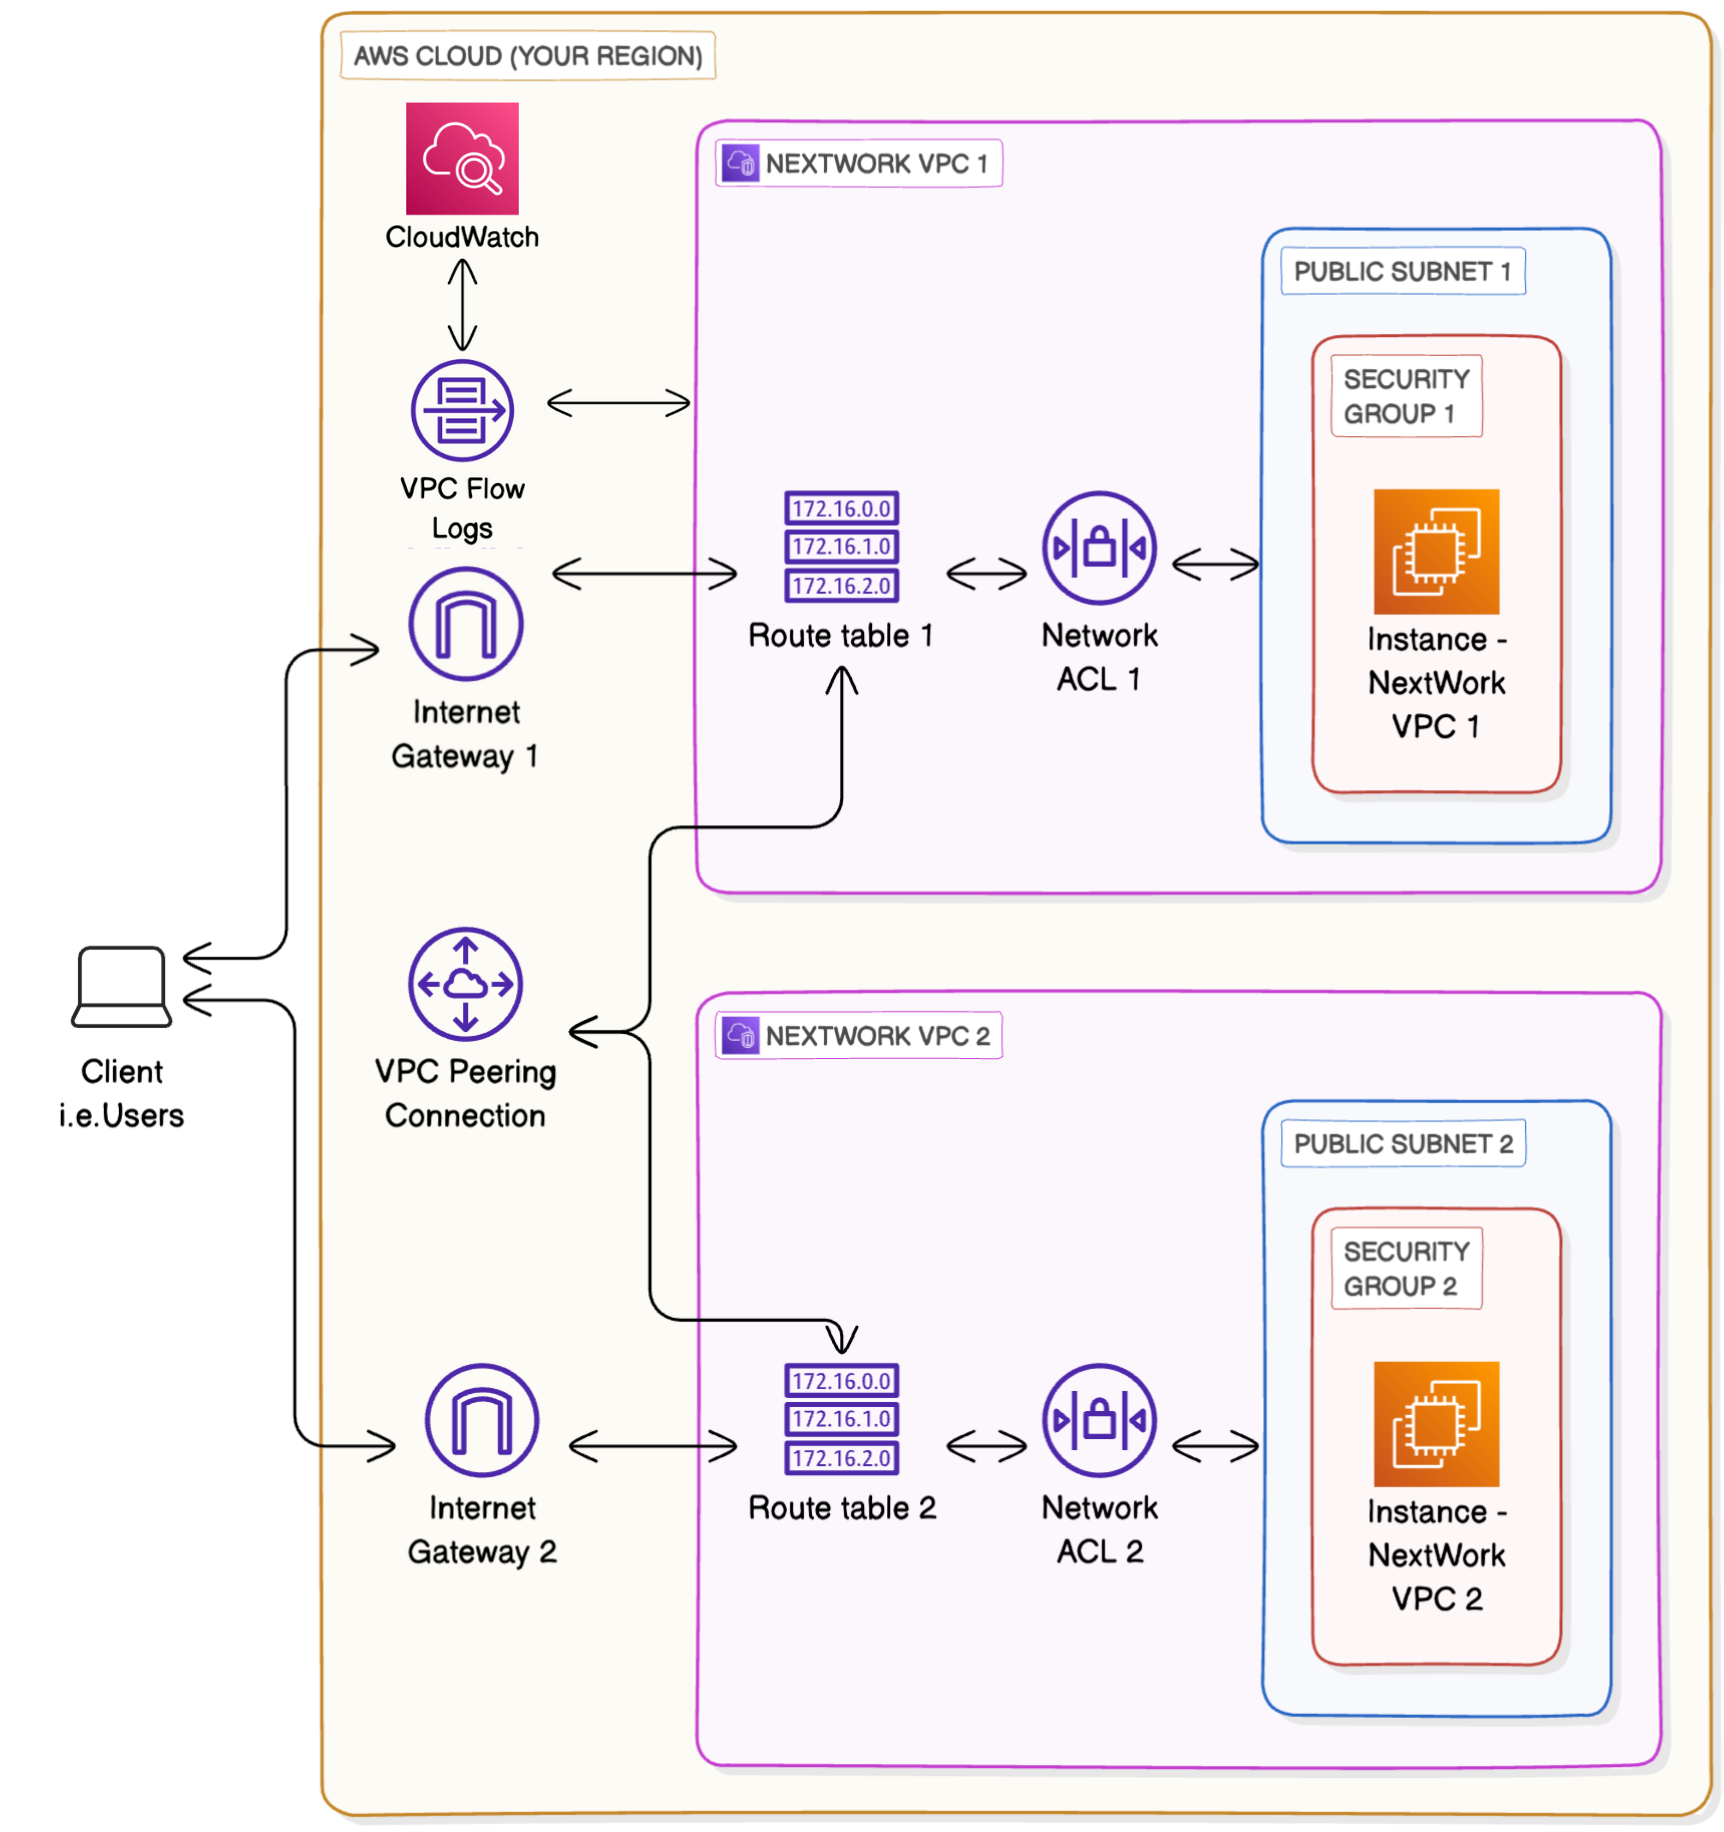
- Go to
CloudWatch Console→ Check region - Go into
Logs→Log groups→ Create Log Groups → Give it aName, set retention as required,Log Class(Standard- logs that get created will get accessed or analyzed regularly,Infrequent Accessinstead, your logs will be stored for long-term archiving - you are charged less for storage, but higher for each time you need to access the, for analysis) - Go to VPC Console → Select VPC →
Flow Logs→ Create Flow Log → Give name, set filter asAll(All- captures all the traffic flowing in and out of the VPC,Accept- traffic that was successfully allowed through your security groups and network ACLs get logged,Reject- traffic blocked by your network settings), Destination -Send to CloudWatch Logs - we need to provide IAM role as
VPC Flow Logsdoesn’t have the permission to write logs and send them toCloudWatch, thus we need to give IAM role to VPC flow logs. Go toIAM Console→ Go to Policies → Create Policy → select JSON and paste the blow policy → Click on next, give it anameandCreate Policy
{
  "Version": "2012-10-17",
  "Statement": [
    {
      "Effect": "Allow",
      "Action": [
        "logs:CreateLogGroup",
        "logs:CreateLogStream",
        "logs:PutLogEvents",
        "logs:DescribeLogGroups",
        "logs:DescribeLogStreams"
      ],
      "Resource": "*"
    }
  ]
}
→ Click on Roles → Create Role → select Custom Trust Policy and paste the config given below
{
	"Version": "2012-10-17",
	"Statement": [
		{
			"Sid": "Statement1",
			"Effect": "Allow",
			"Principal": {
                "Service": "vpc-flow-logs.amazonaws.com"
            },
			"Action": "sts:AssumeRole"
		}
	]
}
→ next → Search the Policy name you have created and select it → Next → Give it a name → Create → Go back to VPC Console → Create Flow Group and give the inputs as created (Destination is CloudWatch group name)
- Perform a Ping Connection to Private EC2 from Public EC2 and see the logs in CloudWatch
- Go to
Log Insightsand select the log and can run the queries for custom analyzing
15. Access S3 from a VPC
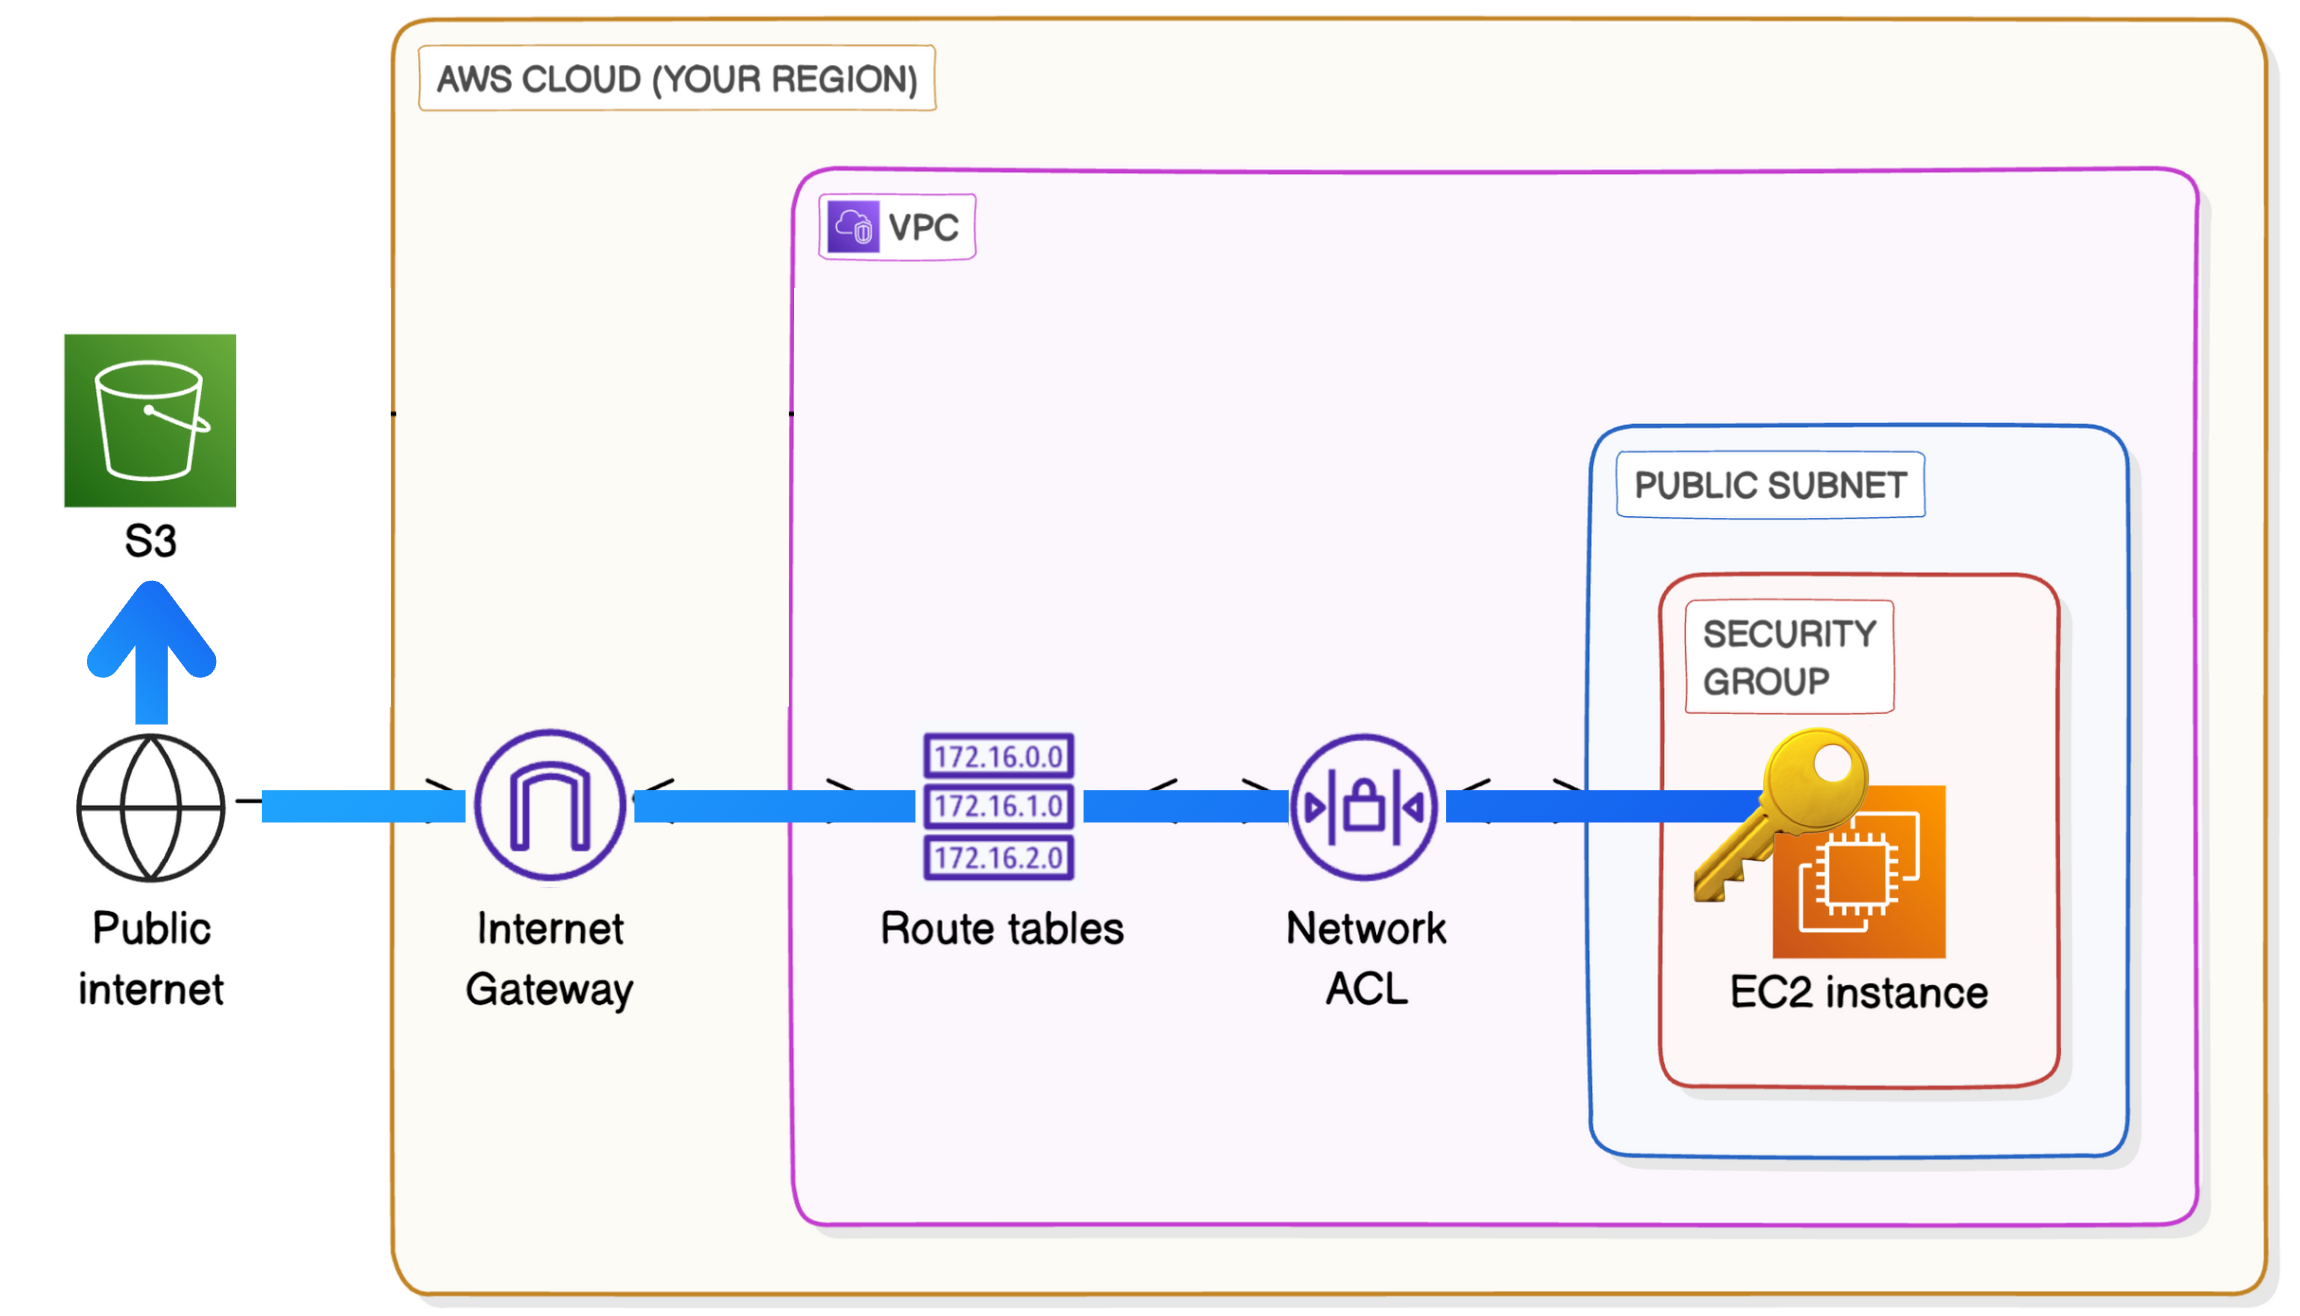
- As we’re connecting to
S3need to set security Inbound rules asAnywhere(check once, ideally will be - Anywhere-IPV4 -0.0.0.0/0) - Go to EC2 and connect to public server → run
aws s3 lsin server → it asks for access keys → Go to Home → Click on your account → Go toSecurity Credentials→Create Access key→ Create the access key → Download csv → Go to Ec2 public server terminal and runaws configureand paste the credentials respectively and then runaws s3 ls - Go to
S3→ Create an bucket with default configuration(no need of rules) and add some files - Go to public EC2 and run
aws s3 lsand you see the created bucket → to see the contents in the bucket runaws s3 ls s3://<bucket_name> - To check whether s3 is accessible or not run
sudo touch /tmp/test.txt && aws s3 cp /tmp/test.txt s3://<bucket_name> && aws s3 ls s3://<bucket_name>→ through this we can confirm that ec2 is able to communicate with s3
16. VPC Endpoints
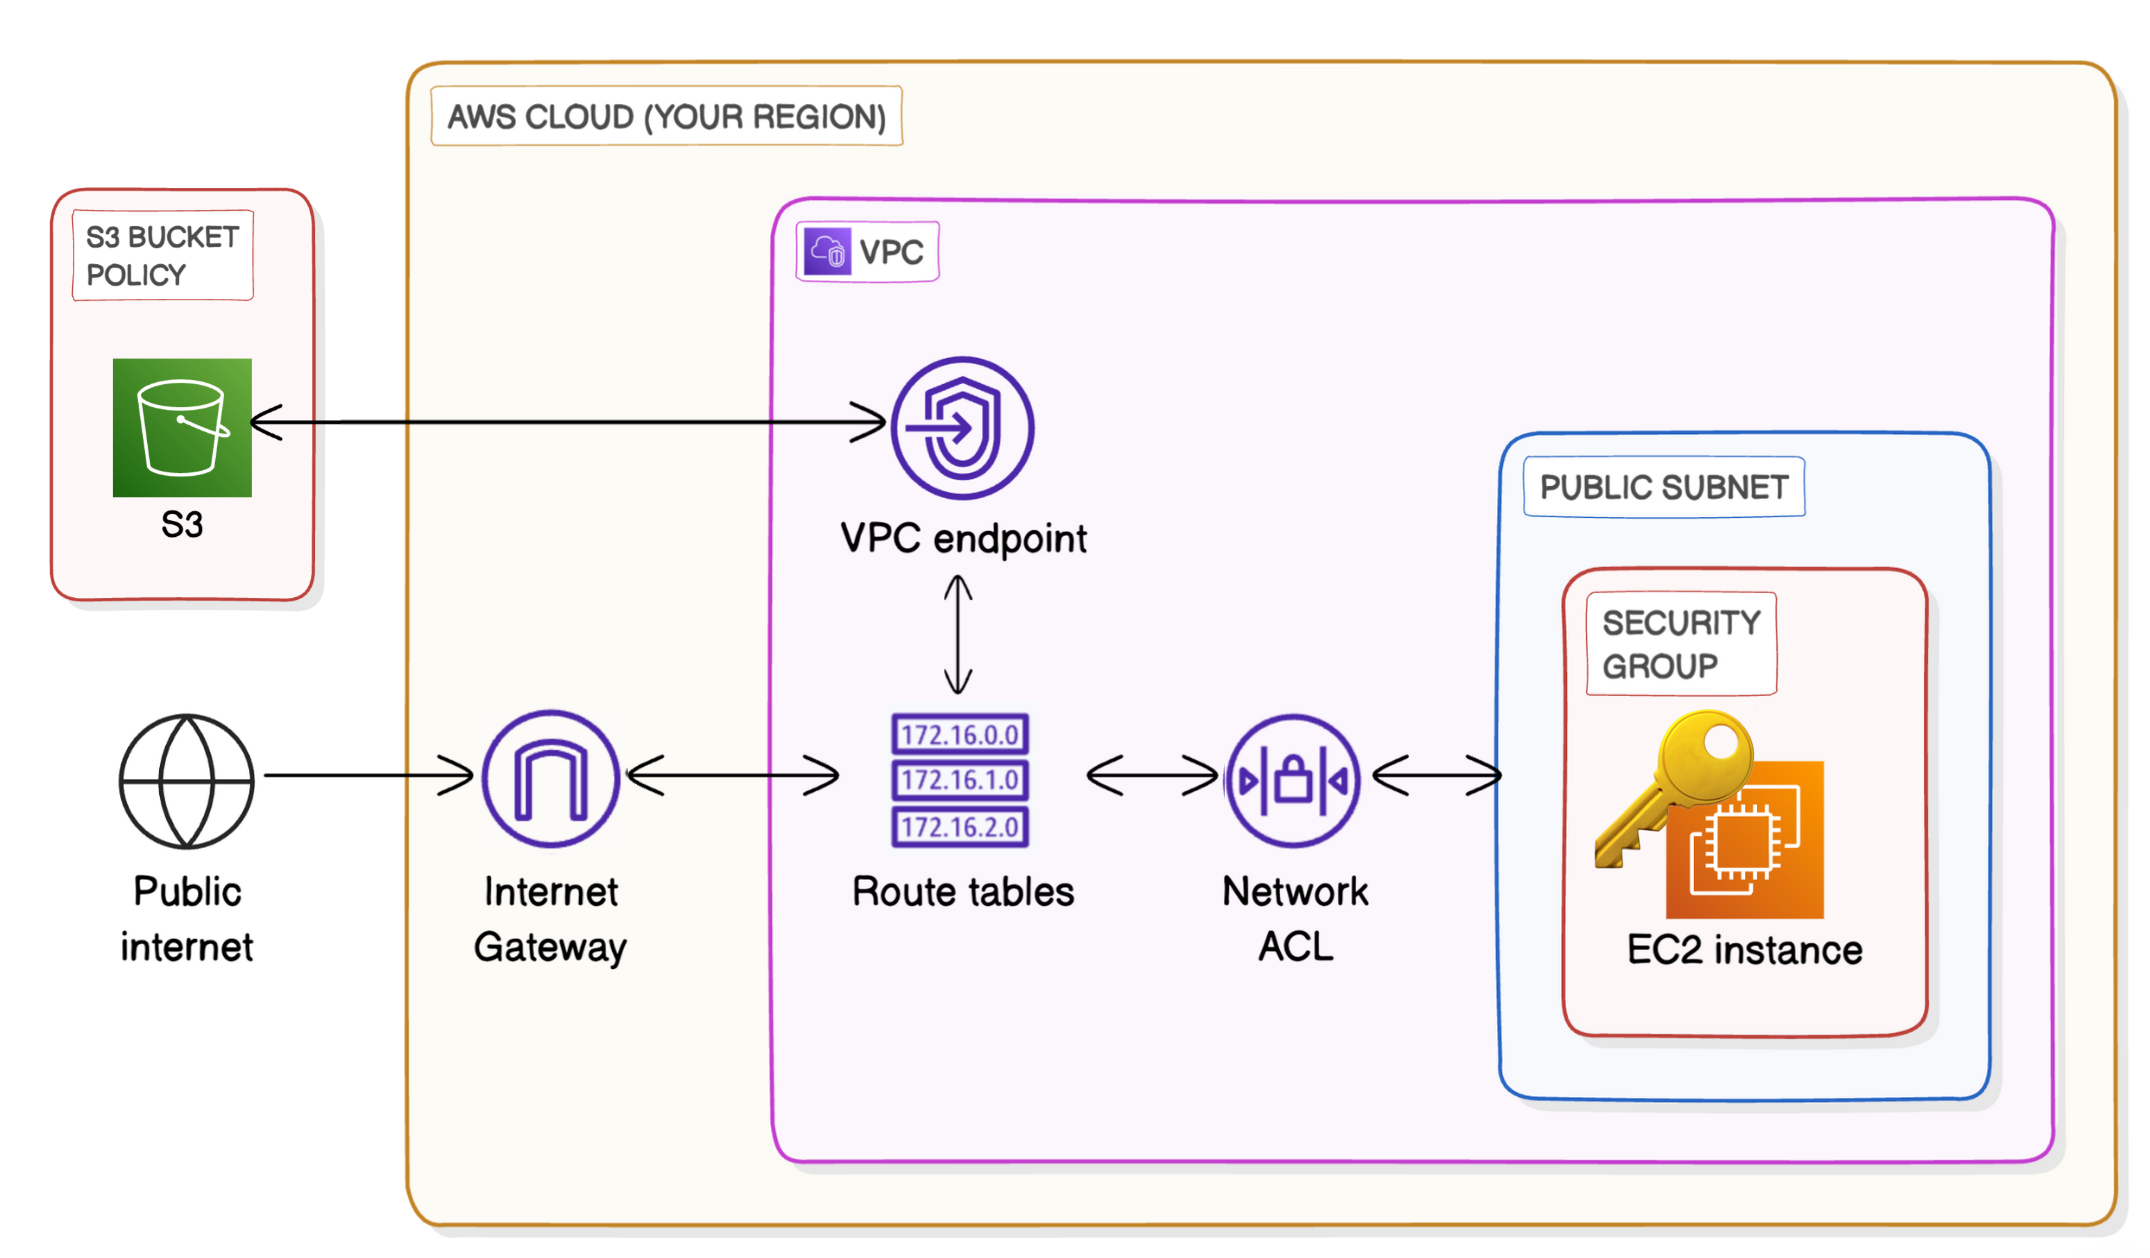 If we connect your VPC directly with S3. This lets your VPC’s resources interact with S3 without traffic needing to go through the internet
- Go to VPC Dashboard → Go to Endpoints (An Endpoint in AWS is a service that allows private connections between your VPC and other AWS services without needing the traffic to go over the internet) → Create Endpoint → Give it a
Name, SelectAWS Services, Search forS3and selectService Name = com.amazonaws.ap-south-1.s3of typeGateway(Gateways work by simply adding a route to your VPC route table that directs traffic bound for S3 or DynamoDB to head straight for the Gateway instead of the internet) → Create Endpoint → Go to VPC Endpoint ID and copyEndpoint ID→ Select Endpoint → SelectRoute Tables→Manage Route Tables→ select the corresponding route table and save - Go to
S3→ Go to Bucket policy and paste below policy and change the values in it
{
  "Version": "2012-10-17",
  "Statement": [
    {
      "Effect": "Deny",
      "Principal": "*",
      "Action": "s3:*",
      "Resource": [
        "arn:aws:s3:::your-bucket-name", // this is present above the policy editor
        "arn:aws:s3:::your-bucket-name/*"
      ],
      "Condition": {
        "StringNotEquals": {
          "aws:sourceVpce": "vpce-xxxxxxx" // endpoint id
        }
      }
    }
  ]
}